
CookLibrary is a recipe curation and editorial platform. We research and curate recipes from public sources, considering ratings, reviews, comments, and feedback. We then refine and present them clearly for home cooks. We are committed to an ad-free, focused experience that makes discovering and preparing recipes easier.

Few homemade breads offer the combination of rustic character, savory flavor, and fragrant freshness found in this Rosemary-Olive Sourdough Bread.
A naturally leavened dough made from bread flour, active sourdough starter, water, and salt becomes the foundation for generous pieces of pitted olives and fresh rosemary.
The olives bring a rich, briny flavor throughout the loaf, while rosemary adds a distinctive herbal aroma that becomes especially inviting as the bread bakes.
What makes this loaf especially appealing is the lamination technique used to incorporate the flavorful additions.
Instead of simply mixing the olives and rosemary into the dough, the dough is gently stretched into a thin rectangle before the ingredients are layered over it and folded inside.
This approach helps distribute the olives and rosemary throughout the finished bread while maintaining the structure of the sourdough dough.
After bulk fermentation, shaping, and a long cold proof in the refrigerator, the loaf is baked in a preheated Dutch oven.
The covered bake helps develop the bread before the final uncovered stage deepens the color of the crust.
The finished loaf has a beautifully browned exterior and a flavorful interior dotted generously with olives and rosemary.
This bread is delicious served as part of dinner, but it also works beautifully as an appetizer alongside good extra-virgin olive oil.
With its fragrant rosemary, savory olives, crisp baked crust, and naturally fermented character, it is a memorable loaf for anyone who enjoys artisan-style sourdough baking.
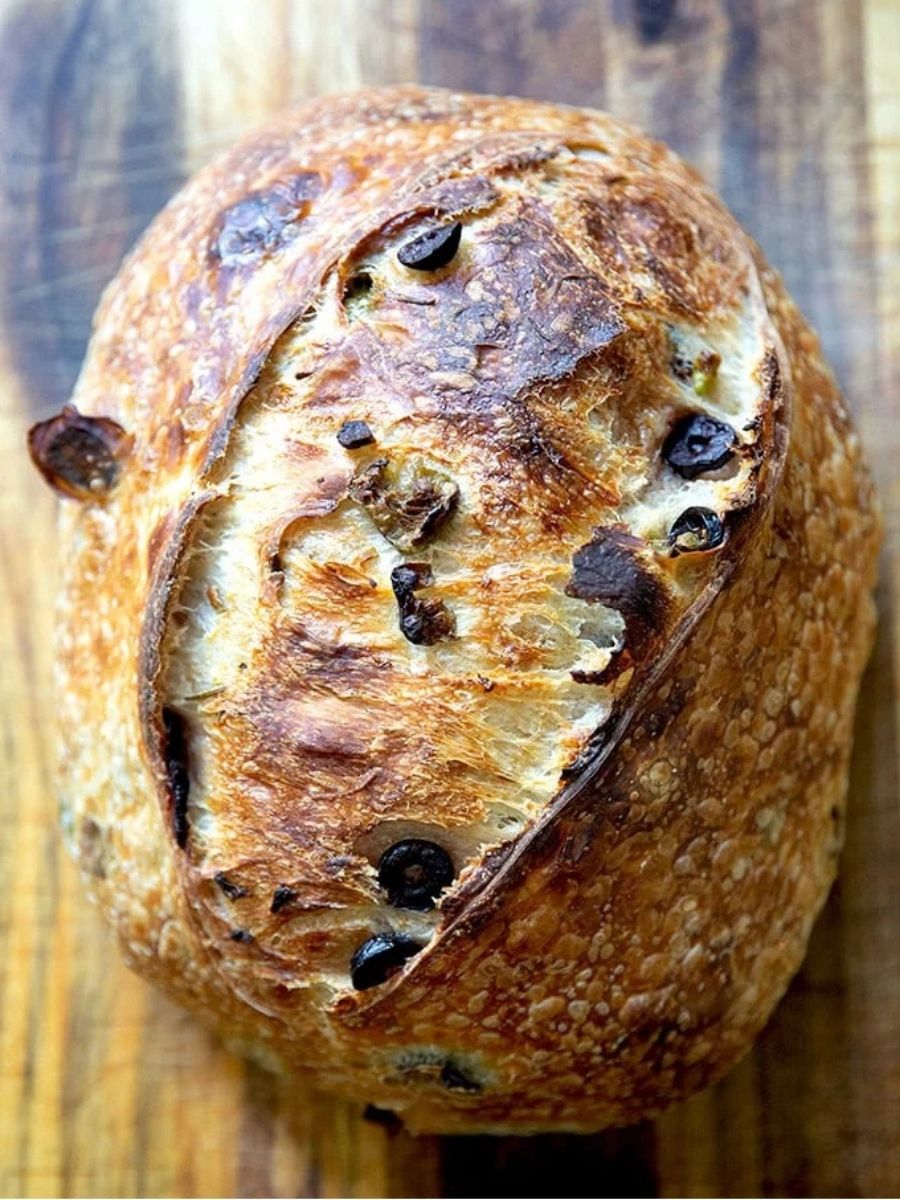

Herby Olive Sourdough Bread
Ingredients
Equipment
Method
- Make the Dough: Add the room-temperature water to a large mixing bowl. Stir in the salt, then add the bubbly, active sourdough starter and mix with a spatula. The starter does not need to be completely incorporated at this stage. Add the bread flour and stir until everything comes together into a sticky dough ball. Cover the bowl and let the dough rest for 30 minutes.
- Stretch and Fold: Wet one hand, grab a corner of the dough, and pull it upward before bringing it toward the center. Continue this motion around the dough for 8 to 10 folds. As you work, the dough should gradually change from shaggy and rough to smoother and more elastic. Slapping and folding the dough can also help develop the dough. Cover the bowl and let it rest for 1 hour.
- Prepare for Lamination: Lightly drizzle a large work surface with olive oil. Uncover the dough and drizzle a little olive oil around its edges. Use a flexible bench scraper to loosen the dough from the bowl, or carefully use your hands if you do not have a scraper. Turn the dough onto the oiled surface, reserving the bowl.
- Stretch the Dough: Using lightly oiled hands as needed to prevent sticking, gently stretch the dough into a large, thin rectangle approximately 15 × 20 inches.
- Add the First Layer of Inclusions: Scatter 4 ounces of the sliced olives evenly over the stretched dough, followed by 1½ tablespoons of the fresh rosemary. Gently press the olives and rosemary into the dough so they stay in place during folding.
- Complete the First Lamination Fold: Begin at one short side of the rectangle. Fold the right edge toward the left so it covers approximately two-thirds of the dough. Then fold the left edge toward the right, covering the dough completely.
- Add the Remaining Inclusions: Scatter the remaining olives and rosemary over the bottom two-thirds of the folded dough.
- Complete the Second Lamination Fold: Starting from the top edge, fold the dough downward so it covers approximately two-thirds of the dough. Fold the bottom edge upward and over the top section to enclose the dough completely. Lift the folded dough bundle and return it to the reserved bowl. Cover the bowl and let the dough rest for 1 hour.
- Perform the Final Stretch and Fold: With both hands wet, gently lift the dough from its center, allowing it to stretch lengthwise while the edges fold underneath. Fold the dough in half once or twice more until it forms a rough ball.
- Bulk Ferment: Transfer the dough to a straight-sided vessel and cover it. Leave it at room temperature until it has increased in volume by approximately 50% to 75%, develops a few bubbles on the surface, and jiggles when the vessel is gently moved from side to side.This stage can take about 5 to 10 hours depending on the season and room temperature, so use the dough's visual cues rather than relying solely on the clock.
- Shape the Dough: Turn the fermented dough onto a clean work surface. Do not flour the surface unless the dough is sticking; if necessary, use a light dusting of flour on the surface and your hands. Gently shape the dough into a round by folding the top toward the center, turning the dough, and repeating the fold-and-turn motion until you have worked around the entire dough. If using a bench scraper, push and pull the dough gently against the work surface to build surface tension.
- Rest the Shaped Dough: Lightly flour part of the work surface if you have not already done so.Place the dough seam-side up and let it rest for 30 to 60 minutes.
- Prepare the Banneton: Line a roughly 10-inch banneton with a flour sack towel. If you are concerned about sticking and are not using a flour sack towel, lightly dust the banneton with flour or rice flour.
- Final Shape and Proof: If making a round loaf, shape the dough again using the same folding method, then place it seam-side up in the lined banneton. If making a batard, shape it according to the batard method. Once the loaf is positioned seam-side up, use lightly floured hands to pinch the seam closed as well as possible. Fold the towel over the dough to cover it, place the entire bundle inside an airtight produce bag or 2-gallon zip-top bag, and refrigerate for ideally 24 to 48 hours. A shorter refrigeration period can be used if necessary.
- Preheat the Dutch Oven: Forty-five minutes before baking, place the Dutch oven inside the oven and preheat to 450°F. Meanwhile, cut a piece of parchment paper large enough to hold the loaf and fit inside the baking pot.
- Turn Out the Dough: Remove the covered banneton bundle from the refrigerator and unwrap the towel. Place the parchment paper over the dough and hold it securely in place. Carefully invert the banneton so the dough releases onto the parchment and countertop.
- Score the Loaf: Using the tip of a small sharp knife or a razor blade, score the surface of the dough in your preferred pattern. A simple slash works well. Use the parchment paper to carefully transfer the scored dough into the preheated Dutch oven.
- Bake Covered: Cover the Dutch oven and bake the loaf at 450°F for 30 minutes.
- Finish Baking Uncovered: Remove the Dutch oven lid and reduce the oven temperature to 400°F. Continue baking for another 10 to 15 minutes, or until the loaf is browned to your liking.
- Cool the Bread: Transfer the baked loaf to a wire rack and let it cool for 30 minutes before slicing.
- Store the Bread: Keep the cooled loaf at room temperature in an airtight plastic bag or container for up to 3 days. The bread can also be frozen.
Notes
- Use a kitchen scale whenever possible for the most consistent dough measurements.
- The recipe uses 12 g of salt, which works well because the olives already contribute saltiness.
- Diamond Crystal kosher salt, fine sea salt, or another preferred salt can be used.
- The sourdough starter should be bubbly and active before beginning.
- The olives can be any variety; the original recipe uses a combination of Castelvetrano and Kalamata olives.
- During bulk fermentation, rely on the dough’s volume, bubbles, and jiggle rather than the clock because fermentation time varies with room temperature.
- The cold proof can ideally last 24 to 48 hours, although a shorter refrigeration period is possible when necessary.
- Allow the baked loaf to cool for 30 minutes before slicing.
- Store the bread at room temperature in an airtight plastic bag or container for up to 3 days.
- The finished loaf can also be frozen.
Chef’s Secret
The most useful technique for this loaf is to pay close attention to the dough during bulk fermentation rather than treating the stated 5-to-10-hour range as a fixed schedule.
Temperature can significantly affect how quickly sourdough develops, so look for the specific signs described in the recipe: the dough should expand by roughly 50% to 75%, show a few bubbles on the surface, and jiggle when the vessel is moved from side to side.
These cues are especially important after the olives and rosemary have been incorporated through lamination.
Waiting for the dough to reach these visual and textural markers helps you move into shaping at the appropriate stage without relying solely on the clock.
Serving Suggestions
Serve thick slices of this rosemary olive sourdough as an appetizer alongside good extra-virgin olive oil for dipping.
It also makes a flavorful accompaniment to dinner, particularly when served fresh after cooling.
For a simple presentation, slice the loaf into rustic pieces and arrange them on a serving board, allowing the olives and rosemary to show through the crumb.
The bread can also be enjoyed on its own, letting the savory olives, fragrant rosemary, and naturally fermented sourdough flavor remain the focus.
Conclusion
This Rosemary-Olive Sourdough Bread combines a crisp, deeply browned crust with a fragrant, savory interior generously filled with olives and fresh rosemary.
The lamination method helps distribute the flavorful additions throughout the dough while preserving the character of the sourdough loaf.
After its long fermentation and cold proof, the bread develops the rustic texture and rich flavor that make it especially satisfying for serving at the table or alongside olive oil.
